How to Test Mechanical Properties: Methods and Techniques
Hey guys, have you ever wondered how the mechanical properties of engineering materials are tested? From determining the strength and durability of materials to evaluating their elasticity, there are a lot of different methods used to test the mechanical properties of materials. In this article, we’re going to talk about some of the most common testing methods used in mechanical engineering.
Common Mechanical Properties and Their Testing Methods
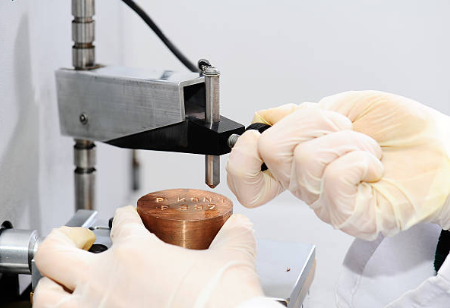
Let’s start with the basics. There are several common mechanical properties that are tested, including elastic modulus, shear modulus, yield strength, ductility, and hardness. Each of these properties is tested using different methods and techniques.
What are the 5 mechanical stresses?
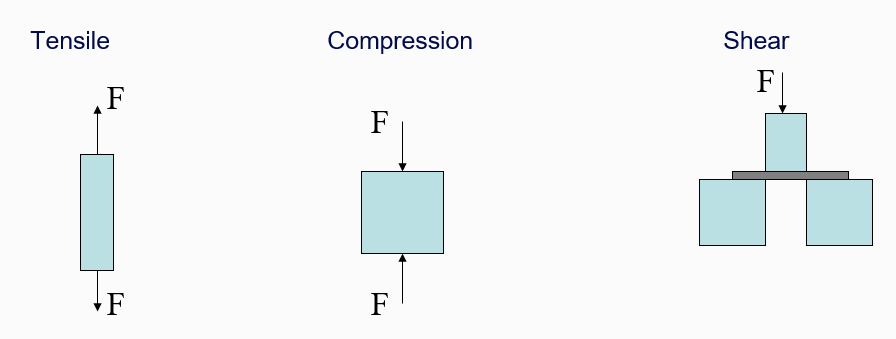
Stress is the force applied to a material, divided by the material’s cross-sectional area. There are five types of mechanical stresses that are commonly tested: tensile stress (stretching/pulling), compressive stress (crushing), shear stress (cutting), torsional stress (twisting), and bending stress (flexing). Each of these stresses is important to understand because different engineering materials will behave differently under different types of stress.
Why do we use engineering stress and strain?
Engineering stress is calculated by dividing the load by the initial cross-sectional area of a material. Engineering strain is the amount that a material deforms per unit length. The engineering stress and strain equations can be seen below:
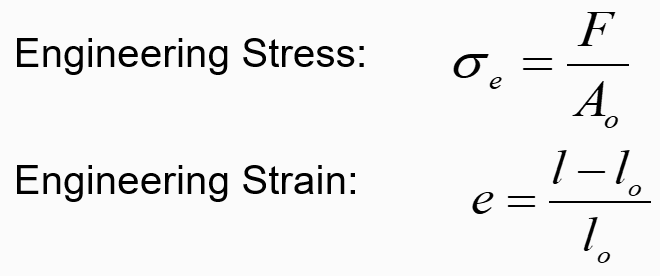
Where:
- se = Engineering Stress (Pa)
- F = Load (N)
- Ao = Initial Area (m2)
- e = Engineering Strain (mm/mm)
- l = Instantaneous length (m)
- lo = Initial length (m)
What is the difference between engineering stress and strain and true stress and strain?
Engineering stress–strain curve assumes that the initial cross sectional area if fixed, while the true stress–strain curve takes into account the instantaneous cross-section area and length. Engineering stress and strain is more conservative and thus it is the most commonly used.

Where:
- s= True Stress
- P = Load
- A = Instantaneous Area
- e = True Strain
- l = Instantaneous length
- lo = Initial length
- Ao = Initial Area
What is the tensile test for?
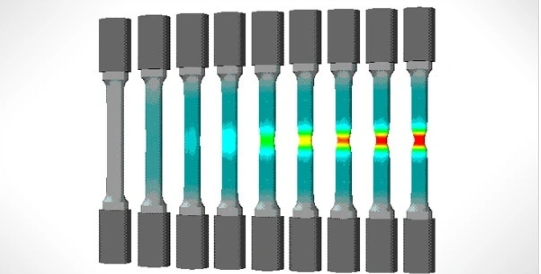
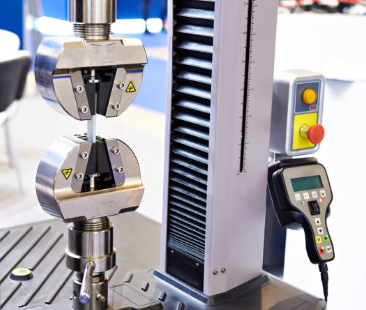
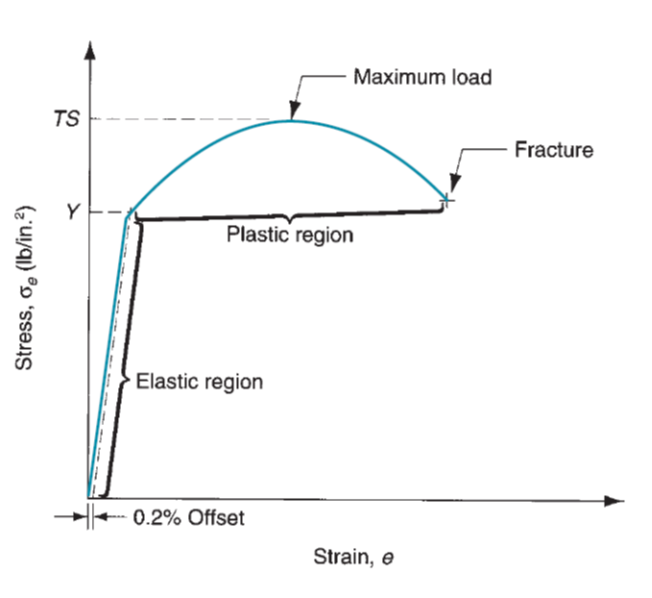
One of the most common destructive tests used to determine mechanical properties is the tensile test. This test is used to provide information about the tensile strength, yield strength, and ductility of the primary metals and metal alloys. Tensile tests involve stretching or elongating a material until it breaks, and the resulting data can provide valuable information about the material’s stress-strain relationship. The tensile strength is the maximum stress or force required to break a material. The test specimens have been standardized by ASTM (American Society of Testing Materials).
What are the properties of tensile strength?
The properties of tensile strength are yield strength, ultimate tensile strength, and fracture strength. Yield strength is the amount of force required to permanently deform a material, while ultimate tensile strength is the maximum amount of tensile stress while being pulled or stretched without failure. Fracture strength is the force required to break a material after it has been weakened by a flaw or defect.

What are a compression test and its purpose?
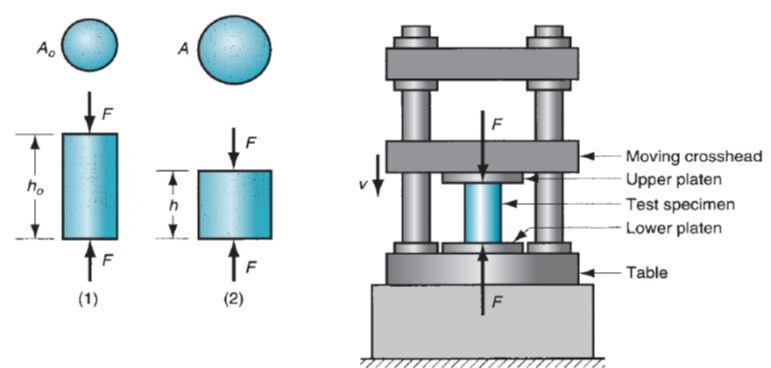
In addition to tensile tests, compression tests are also commonly used to determine mechanical properties. A compression test reveals how a material behaves when under a crushing load until it deforms or fractures. These tests can provide valuable information about a material’s compressive strength and other properties. A compression test is an important test to understand how a material will behave during metalworking. Many operations during metalworking are performed by applying compression loads, for example: rolling, forging, extrusion, etc. Compression tests are also useful to determine the properties of some materials that can not withstand tension loads, such as cast iron, ceramics, concrete, etc. To conduct a compression test, you must use a standardized test specimen, ASTM E9 (1.0-inch diameter, and 2 inches in height), which is squeezed between the anvils of a compression testing machine.
What is the hardness test used for?
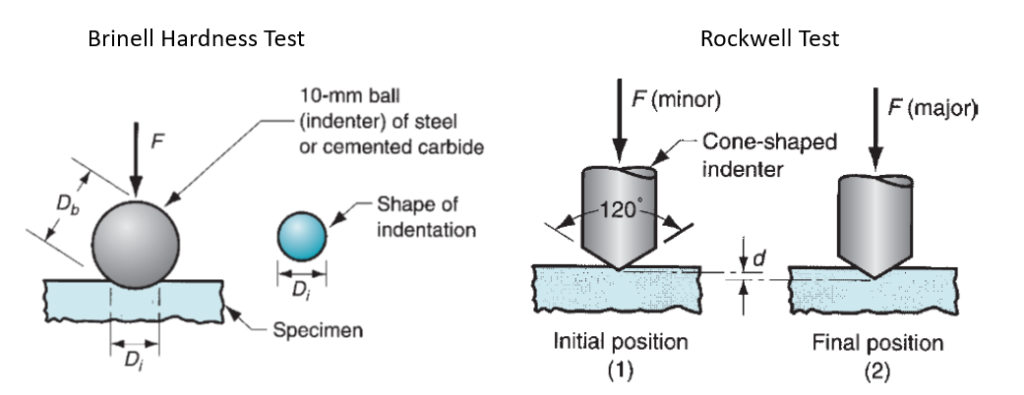
Another important test used to determine mechanical properties is the hardness test. Since there are several different types of hardness tests, the quantitative value of hardness should always be evaluated in relation to the type of indenter and its geometry. Hardness tests are used to measure a material’s resistance to:
- Wear
- Drilling
- Scratching
- indentation
What are the four types of hardness testing?
Several hardness tests can be performed based on this definition including;
- Brinell Hardness Test (ASTM E10)
- Rockwell (ASTM E18)
- Vickers
- Knoop
Hardness Test Characteristics
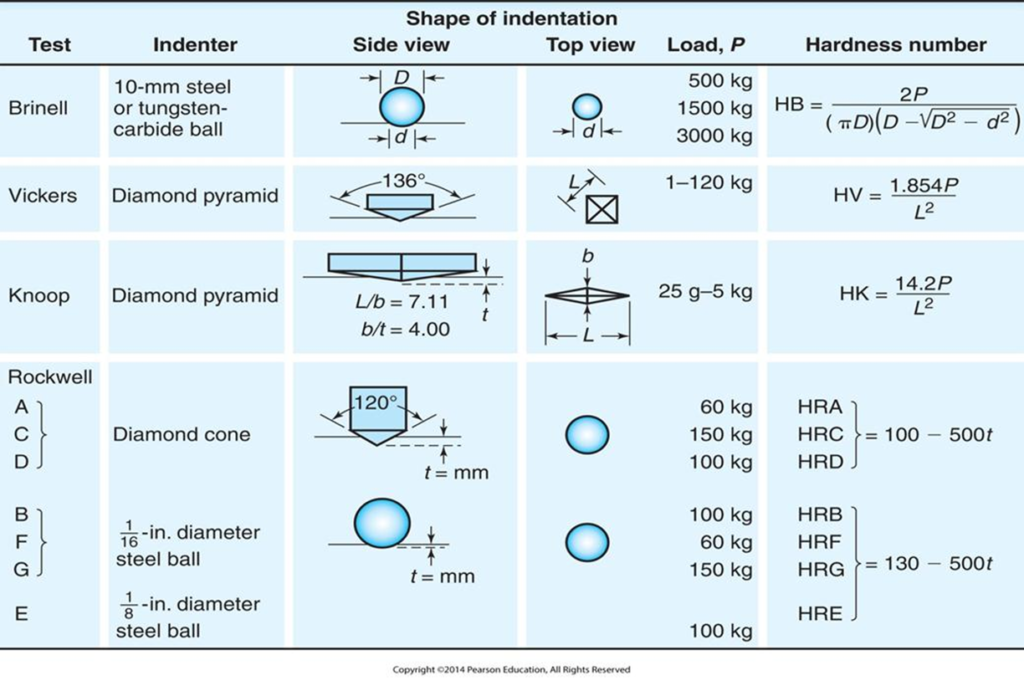
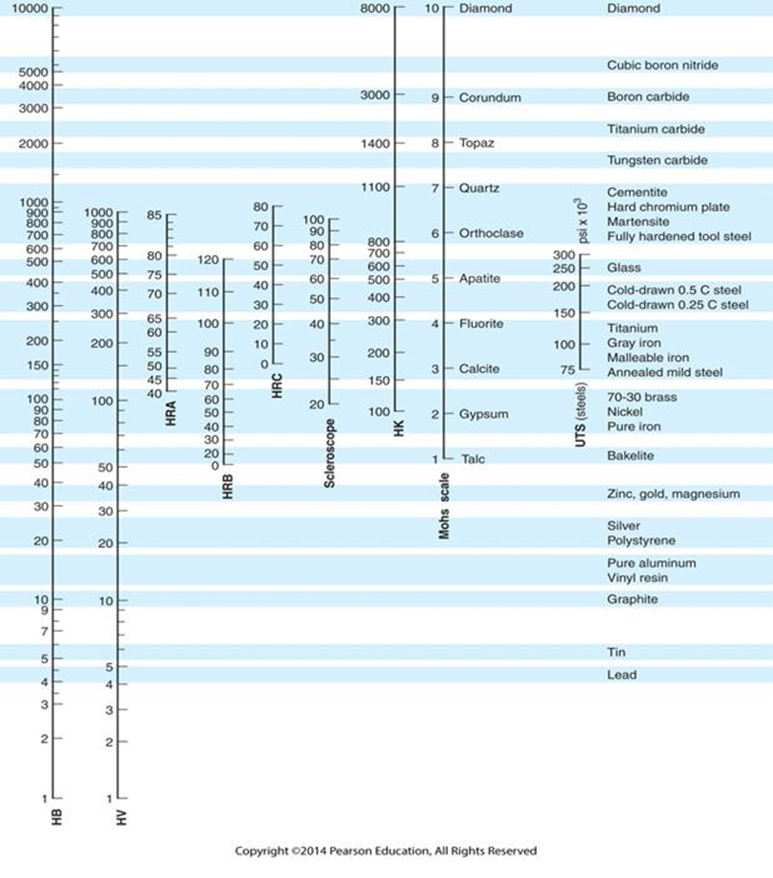
Hardness Scale
The chart below is used for converting various hardness scales. Since all the hardness test are limited in range. However because of the many factors involved, these conversions are approximate.
What are the advantages and disadvantages of the Brinell hardness test?
Advantages:
- It measures the hardness of a relatively large area, therefore, it is useful in measuring the hardness of inhomogeneous materials such as cast iron.
- Relatively simple and easy to conduct
Limitations:
- It cannot be used on very hard or very soft materials
- Not suitable for thin specimens (minimum thickness 10 times the depth of indentation)
- Not valid for case-hardened surfaces
- The test must be conducted far from the edge of the material so that no edge bulging can occur
- Indentation could be large to be objectionable on certain finished parts
- Indentation could be difficult to see on colored material such as brass
How do you test for fatigue?
Fatigue tests are used to determine how materials will perform under repeated loading and unloading over time. Fatigue is engineers’ favorite excuse for failure. To carry out a fatigue test, a sample is put in a fatigue tester or fatigue test machine and subjected to the pre-determined test stress, then unloaded to either no load or an opposite load. There are several types of fatigue tests, including S-N curve fatigue tests, cyclic stress-strain fatigue tests, and fracture mechanics fatigue tests. Each test is important for understanding how materials will behave under real-world conditions.
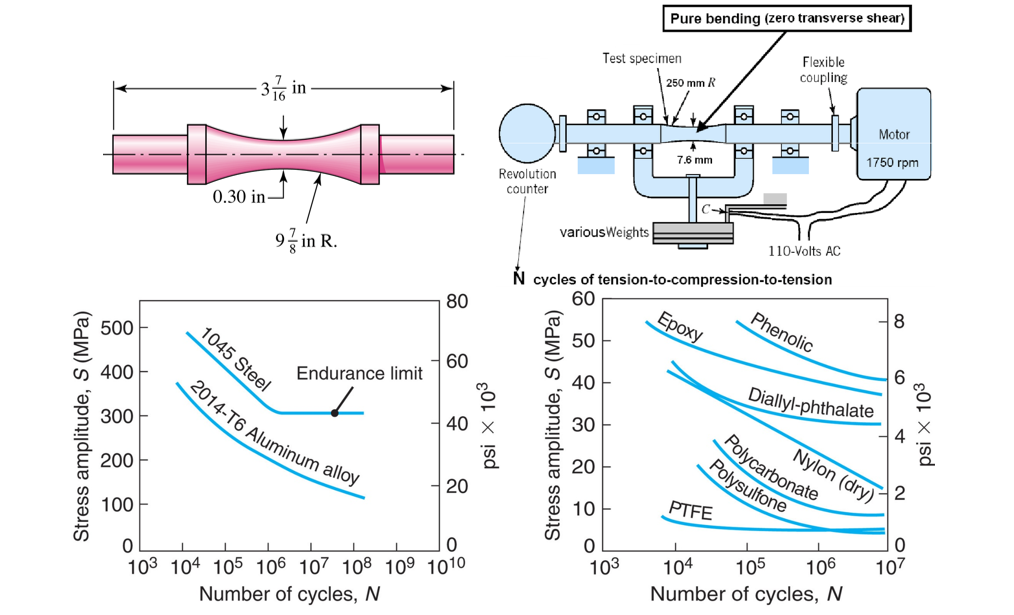
Steels typically show an endurance limit, = 40% of yield; this is typically associated with the presence of a solute (carbon, nitrogen) that pines dislocations and prevents dislocation motion at small displacements or strains (which is apparent in an upper yield point). Aluminum alloys do not show endurance limits; this is related to the absence of dislocation-pinning solutes.
What is impact testing in mechanical engineering?
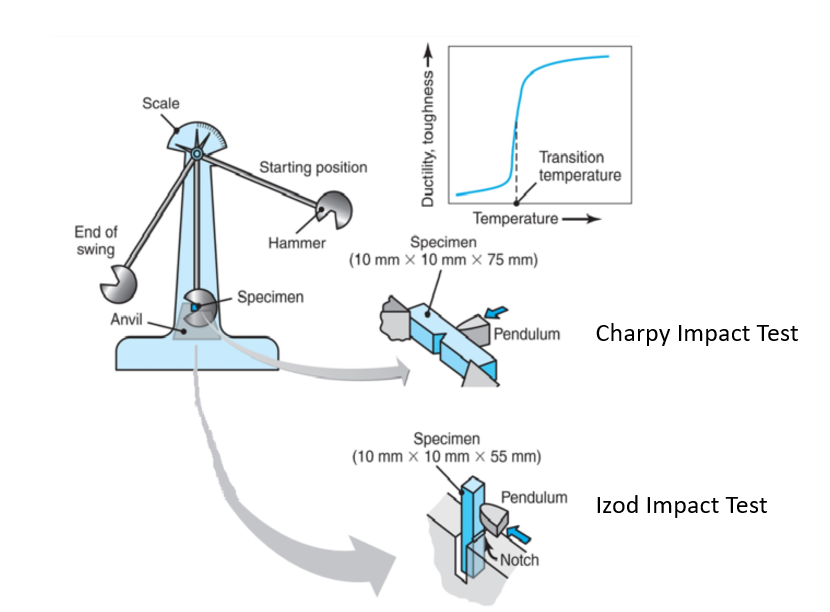
Impact tests are used to measure the impact toughness of a material. These tests are important for understanding how materials will behave in situations like car accidents (crashworthiness) or other high-impact events. Impact testing can provide valuable information about a material’s ability of the material to absorb energy during impacts or sudden shocks. Materials that have high impact resistance generally have high strength, high ductility, and, hence, high toughness. The two types of impact tests are:
- Charpy test (after the French scientist G. Charpy), the specimen is supported at both ends
- Izod test (after the English engineer E.G. Izod), the specimen is supported at one end, like a cantilever beam
What is creep in engineering?
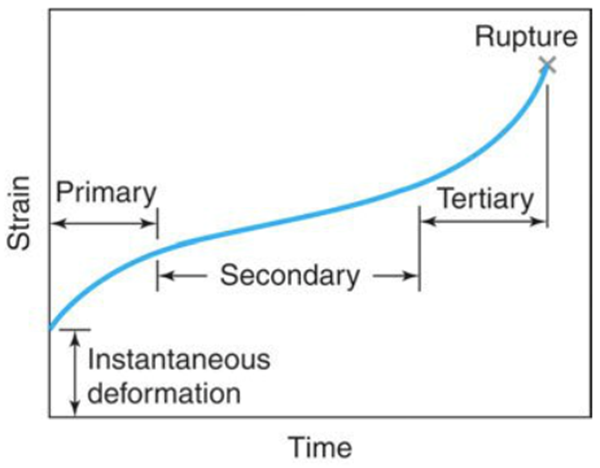
What is creep? Creep may be defined as a time-dependent permanent deformation of a component under a static load (constant stress) maintained for a period of time. This phenomenon occurs in metals and some nonmetallic materials, such as thermoplastics and rubbers, and it can occur at any temperature. The mechanism of creep at elevated temperatures in metals is generally attributed to grain-boundary sliding. Creep is especially important in high-temperature applications, such as automotive exhaust, gas-turbine blades, and components in jet engines and rocket motors.
Best Practices for Mechanical Testing and conclusion
When it comes to mechanical testing, there are several best practices to follow to ensure accurate and reliable results. These include proper sample preparation and handling, instrument calibration and verification, and following established test procedures and data analysis methods.
In conclusion, understanding how mechanical properties are tested is an important part of mechanical engineering. By using the methods and techniques described in this article, engineers can make informed decisions about material selection and design to create safer and more durable products.

