What is a Charpy impact test?
The Charpy impact test, also commonly referred to as the Charpy V-notch test by material scientists, serves as a standardized high-strain rate examination to quantify the energy absorbed by a material upon fracture. The absorbed energy functions as an indicator of the material’s notch toughness.
Widely employed in various industries, this test is favored for its simplicity in preparation and execution, enabling a quick and cost-effective acquisition of results. However, a drawback is that certain outcomes are solely comparative.
What Is the History of the Charpy Impact Test?
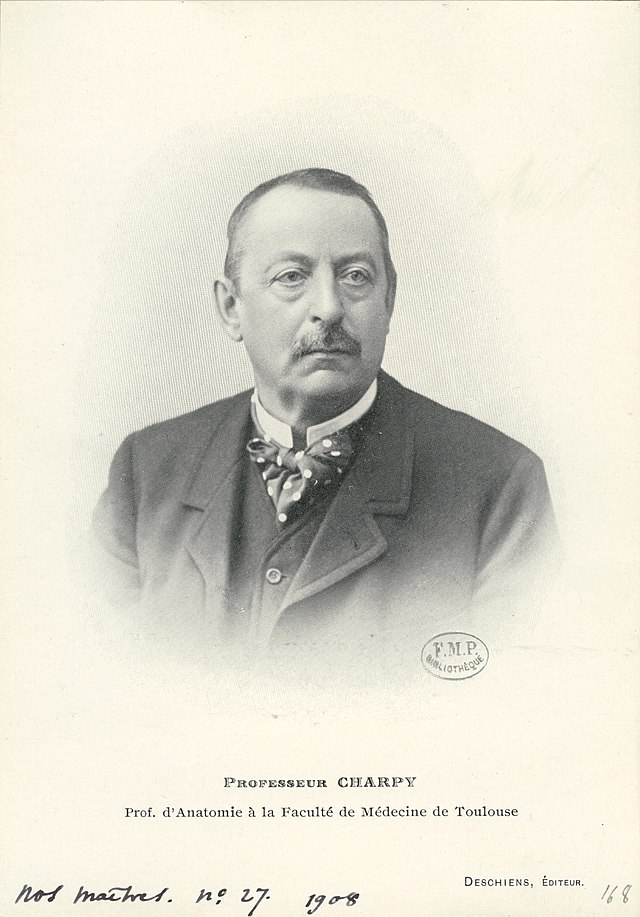
The Charpy impact test, introduced by Georges Augustin Albert Charpy (1865–1945) in 1901, is widely utilized for efficiently evaluating the toughness of materials. This method assesses the energy absorbed by a standard notched specimen when it fractures under an impact load.
Its ongoing application as a cost-effective quality control measure remains instrumental in assessing notch sensitivity and impact toughness across various engineering materials such as metals, composites, ceramics, and polymers. The standard Charpy impact test specimen, as depicted in the procedure section, has dimensions of 55 mm × 10 mm × 10 mm, with a machined notch along one of the larger dimensions.
The impact test is conducted by striking the specimen with a hammer on a pendulum arm, the test quantifies the absorbed energy during fracture under the impact load. Factors affecting material toughness include low temperatures, high strain rates (via impact or pressurization), and stress concentrators like notches, cracks, and voids.
The Charpy impact test was designed to investigate the premature failures of machinery like steam boilers, steam engines, and military armaments. Building upon S.B. Russell’s pendulum-based method, Charpy enhanced the test’s precision and sensitivity by incorporating a notched sample. Recognizing the value of notch additions, Charpy’s contributions led to significant improvements, earning the test its namesake.
Charpy’s involvement extended beyond the test’s invention, encompassing various standardization initiatives and technical enhancements, solidifying his pivotal role in the development and widespread adoption of this impactful testing method.
What Is the Charpy Impact Test?
The Charpy Impact Test, also known as a V-notch test, evaluates a material’s impact strength by measuring the energy required to fracture a standardized sample with a machined V-notch. Using a released pendulum, the test calculates energy absorption based on the pendulum’s height before and after passing through the specimen. This inexpensive and simple test is applicable to determine a material’s brittleness—higher energy indicates ductility, while lower energy suggests brittleness.
The test can be conducted at varying temperatures to identify the Ductile-to-Brittle Transition Temperature for ductile materials. Despite its simplicity, the Charpy test only provides total energy data during fracture, lacking details on specific fracture phases. This test is widely used in construction and manufacturing, assessing materials’ toughness and impact resistance for applications like bridges, pipelines, and machinery, aiding in the design and quality control of engineering components.
What is the purpose of the impact test?
Impact testing serves to assess a material’s impact toughness, representing its resistance to impact forces. The ability to quantify the impact property is a great advantage in product liability and safety.
This involves three main tests: the tensile impact test, the Charpy V-notch test, and the Izod impact test. Engineers use the Charpy impact test for comparative assessments, providing insights into material impact strengths. Conducted across temperature ranges, it enables plotting the Ductile-to-Brittle Transition Temperature (DBTT) on a graph, indicating when a typically ductile material turns brittle.
What Is the Difference Between the Charpy Impact Test and the IZOD Impact Strength Test?
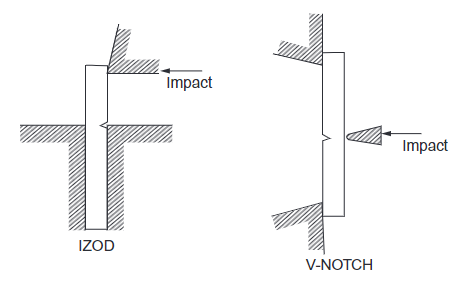
According to ASTM E23, the primary distinction between Charpy and Izod lies in the sample’s orientation—horizontal for Charpy and vertical for Izod. The Izod impact test was named after English engineer Edwin Gilbert Izod. The Izod impact test is like the Charpy impact test and is used to test materials at low temperatures.
What is the Charpy impact test used for?
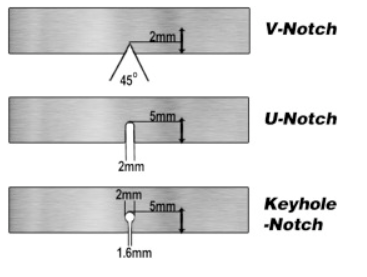
The purpose of the impact test is to assess the response of a known material, such as polymers, ceramics, and composites when subjected to sudden stress. It specifically evaluates the toughness, brittleness, notch sensitivity, and impact strength of engineering materials under high-rate loading. Quantifying the impact property is advantageous for product liability and safety considerations. Various specimen types with different notch configurations, such as V-notch, U-notch, and keyhole notch, are used in impact testing.
The Charpy and Izod configurations are the most common, with the key difference being the notch’s position relative to the striker. The keyhole impact test, resembling a machined keyhole, is employed by steel casting industries and follows similar testing procedures as V and U notches. Keyhole impact testing is particularly useful for materials with restricted thickness, extending to cryogenic temperatures.
The object of a Charpy impact test is to understand the impact energy and determine the impact strength of the desired material. The reason for doing this experiment in the industry is to make sure that you are selecting adequate materials to withstand a very high strain rate. The test method consists of a specimen being subject to an impact or instant load, to find the impact energy absorbed by the material.
What Is the Unit for the Charpy Impact Test?
Results from the Charpy impact test are quantified in joules, the standard unit for energy in the International System of Units (SI). This unit represents the work executed by a 1-newton force displacing a sample by 1 meter in the direction of the force. The obtained joule value can be employed to determine the impact energy in J/m². This calculation involves dividing the joule value by the cross-sectional area of the sample at the notch.
What is the practical use of the impact tests?
An example of a practical impact test would be in the automotive industry where one of the primary goals for an automaker is to ensure the vehicle they are designing can meet all FMVSS crash safety tests. To ensure the crashworthiness of a vehicle automakers ensure the vehicle’s body-in-white (BIW) design can absorb the impact energy during a crash to the maximum extent while maintaining deceleration and intrusion into occupant space within desirable levels. This test also played a pivotal role in understanding the fracture challenges encountered by ships during World War II.

The impact test’s qualitative outcomes offer insights into a material’s ductility. A flat plane fracture indicates brittleness, while jagged edges or shear lips suggest ductility. Typically, materials exhibit a combination of both fracture types. Therefore, comparing the extent of jagged and flat surface areas in the fracture provides an estimate of the percentage of ductile and brittle characteristics.
How do you perform a Charpy impact test:
Materials Required:
The materials required:
- The specimens
- Tinius Olsen Impact Testing Machine
- vernier calipers
- Safety glasses.
- wooden block (safety)
- Safety shield
Procedure:
- Before beginning the experiment put on safety glasses.
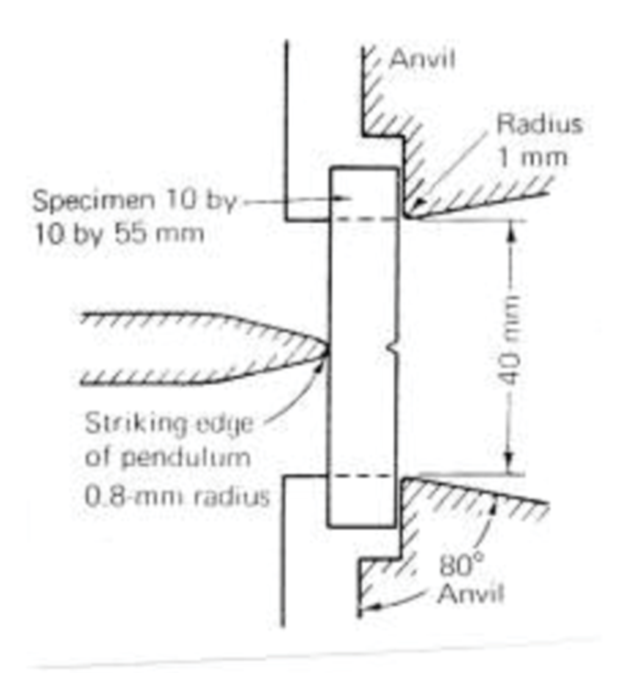
- Verify that the specimen profile measurements meet tolerance which is required to perform an accurate Charpy Impact test. See Figure 1: Impact Test Specimen below.

3. Raise the hammer (pendulum) all the way up until it is locked by the safeties.
4. Remove the safety block.
5. Run the Tinius Olsen Impact Testing Machine without a specimen to calibrate the machine and help account for friction error in measurement. (After every run makes sure to lock the hammer with the safeties in between runs). Perform this test 3 times and find the average of the frictional force.
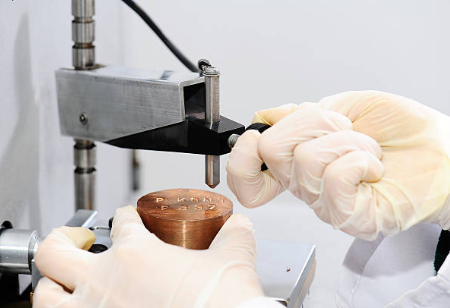
6. Place the specimen so it is resting on the anvil, on the Tinius Olsen Impact Testing Machine.
7. Make sure that the notched specimen is centered and facing outward so the notch dictates how the specimen will fail. (Notch should be on facing away from the hammer, opposite to the impact side) See Figure 2: Impact Test setup
8. Make sure to reset the gauge on the Tinius Olsen Impact Testing Machine (move the indicator on the scale to the end of the scale).
9. Place the safety shield to cover the Tinius Olsen Impact Testing Machine to cover and protect it from any pieces of loose metal.
10. Remove safeties so the pendulum impacts and break the specimen (do not get in the way of the hammer)
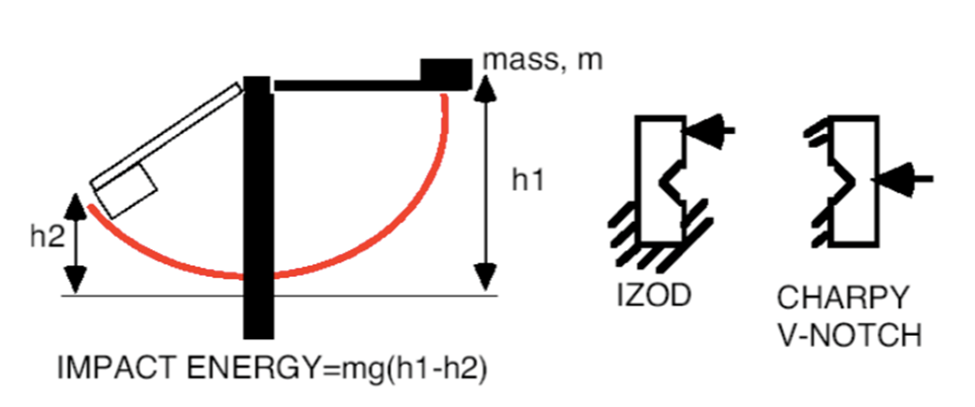
11. Use an electric brake to slow down the hammer until it comes to a stop.
12. Record measurement readings from Tinius Olsen Impact Test and subtract the force due to the friction of the bearings ( step 5)
13. Repeat steps 6-11 for all specimens which will be tested
Equations/Givens
Theory:
The theory behind this experiment is to find out which material would be best for different applications. To make sure that materials that are picked will not fail during function due to impact loading.
Equations:
% error:


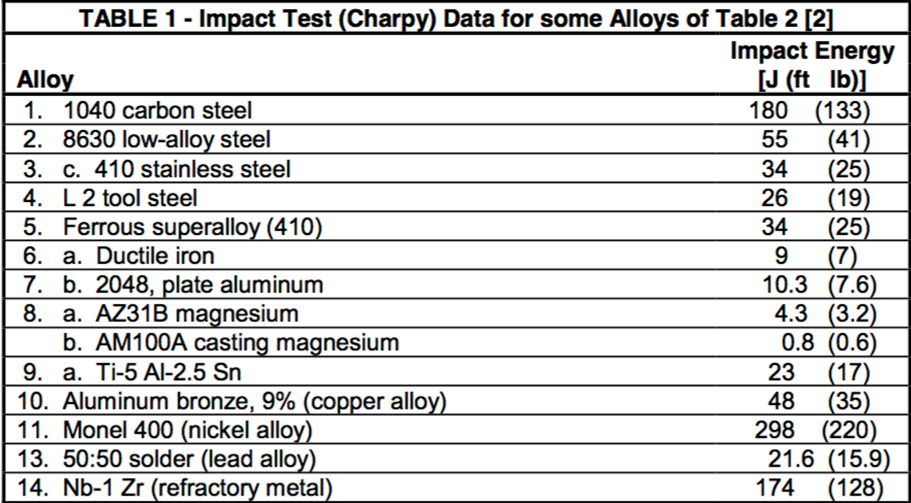
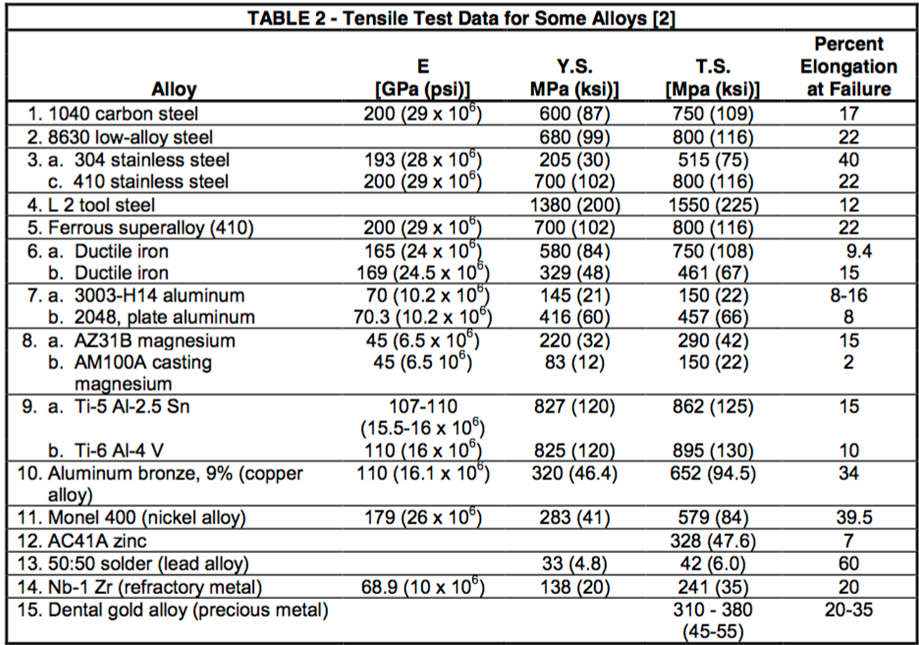
Published data charts:
Show your work
Example calculations (1018 steel):
% error:

Data sets/ composite scores:
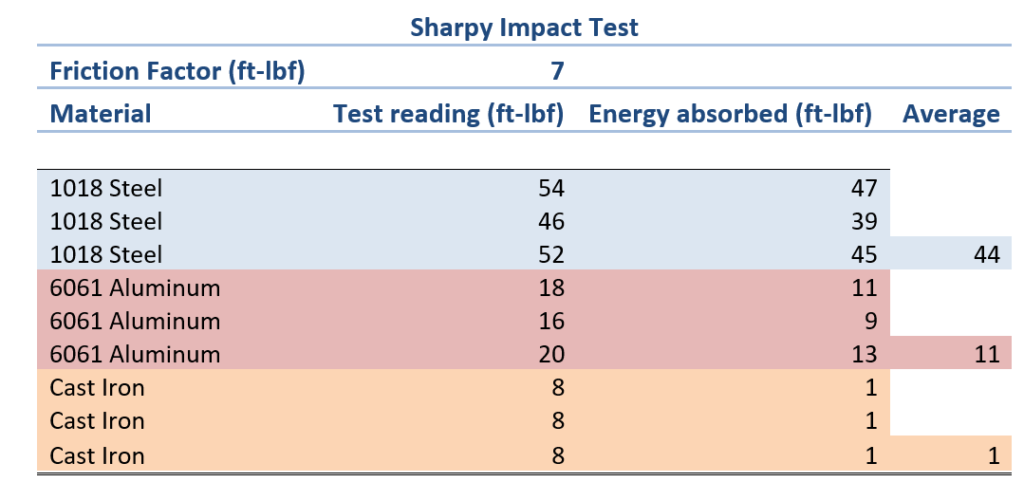

Experiment Findings
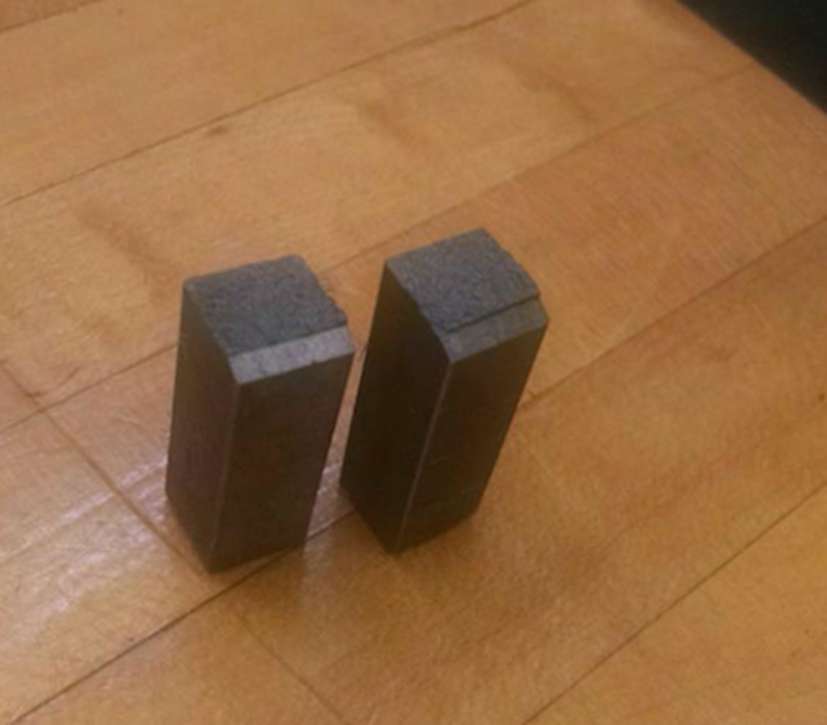
After conducting this experiment the initial suspicions were confirmed. The greater the carbon content in steel the less ductile and therefore the lower the fracture energy. A good example of this would be cast-iron. Cast iron is a very hard and brittle material since it has a carbon content greater than 2% (see iron-carbon diagram). Cast iron also only absorbed 1 ft-lbs of force from the impact. So what is observed after conducting the Charpy test is a brittle fracture or “clean cut”, the material does not look like it was pulled apart as in other samples. See Figure 3: Cast-iron specimen below.
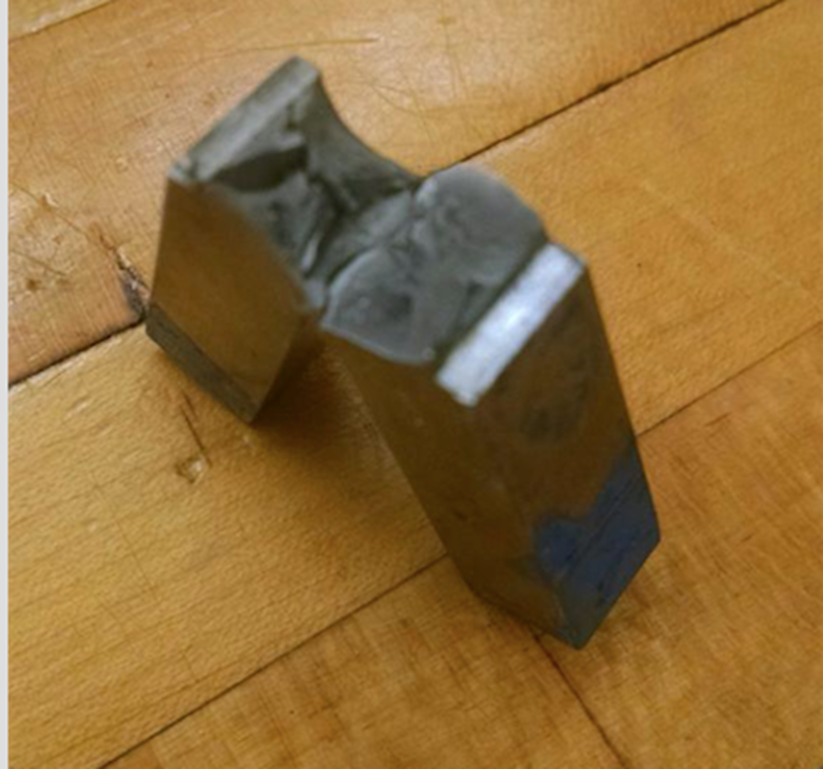
1018 Steel Results
Unlike the Cast-iron the 1018 steel was the most ductile material and absorbed on average 44 ft-lbs. When the steel was tested it looked like the steel was pulled apart similar to a piece of taffy. The internal structure of the steel was destroyed. Also during one of the trials the hammer did not completely break the steel, it was still held together by a small outer layer. To see a sample of the 1018 steel please see Figure 4: 1018 Steel Specimen
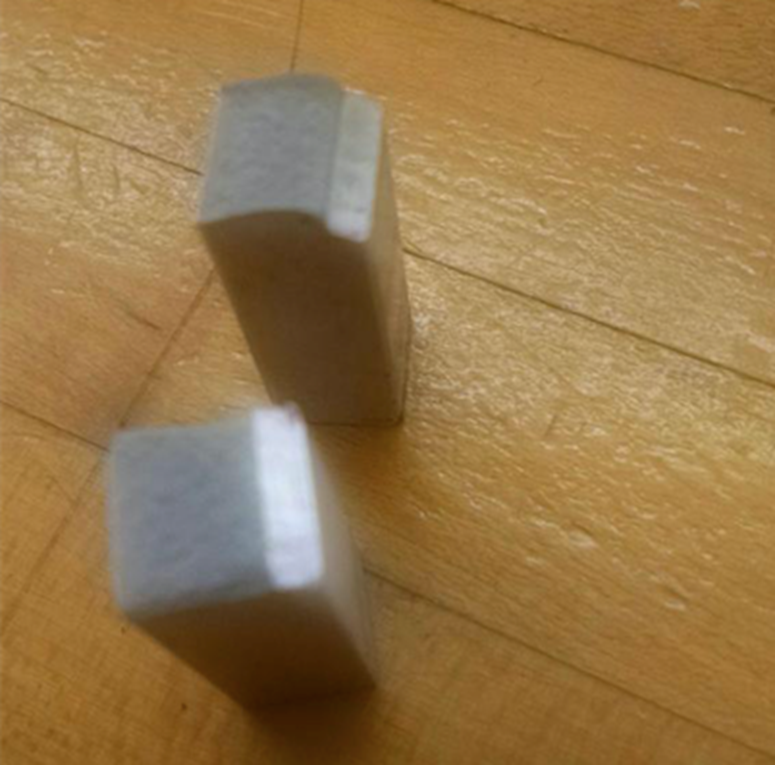
6061 Aluminum Results
The final specimen that was tested was the 6061 aluminum alloy. The aluminum was in the middle of both the cast iron and steel, as the aluminum was not as ductile as the steel but it was also not as brittle as the cast iron. On average the absorbed energy of 6061 was 11 ft-lbs. after the hammer broke the specimen it looked like it had minor pulling of the internal structure but nothing too major. To see a sample of the 6061 aluminum alloy please see Figure 5: 6061 Aluminum alloy specimen at the top of the following page.
What is the result of the impact test?
The amount of energy absorbed by each specimen should be equal to the total area under the stress-strain diagram. The 6061 Aluminum alloy has an average impact strength of 11 ft-lbs and when compared to the closest alloy in the charts provided which was 2028, plate aluminum had an impact energy of 7.6 ft-lbs. By comparing these two figures I ended up with a 44.7% error. The 1018 steel had an average impact strength of 44 ft-lbs. when compared the 1018 steel to the closest material I found on the charts which were 8630 low-alloy steel, which had an impact strength of 41 ft-lbs.
This comparison resulted in a 7.31% difference. Cast Iron was difficult to compare to other alloys because there was no real material that was close to casting iron, so after comparing the different properties of cast iron to the list of alloys in Table 2: Tensile Test Data for some Alloys, it decided to compare cast iron to AZ31B Magnesium which had impact energy of 3.7 ft-lbs. this resulted in a 68.7% error. These % errors are very high but justifiable because we did not have the correct information to compare to.
References:
- Morrow H. , Kokernak, R. person’s statics and strength of materials 7th edition, 2010 pg 480
- Hiyam Farhat, Chapter 3 – Materials and coating technologies, Editor(s): Hiyam Farhat, Operation, Maintenance, and Repair of Land-Based Gas Turbines, Elsevier, 2021, Pages 63-87, ISBN 9780128218341, https://doi.org/10.1016/B978-0-12-821834-1.00007-https://www.sciencedirect.com/science/article/pii/B9780128218341000071

